How to Make Pumpkin Butter - Easily, With Step-by-Step, Illustrated Directions
How to Make Homemade Pumpkin Butter - Easily!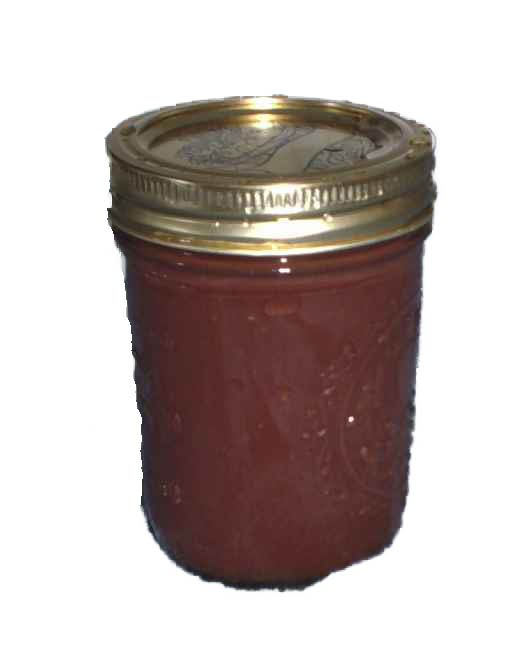
Click here for a PDF print version
If you have enjoyed pumpkin butter from farms stands, and wanted to make your own, but thought it might be too difficult; guess again! These step-by-step directions will make it so simple, anyone can make better pumpkin butter and at a much lower cost. It's inherently vegan-friendly and gluten-free... and if you use Stevia or Splenda, it should meet the dietary needs of diabetics, too!
Now, with a crockpot, it's easy!
Prepared this way, the jars have a shelf life of 6 months in the fridge. Note that it should NOT be stored on the shelf, unrefrigerated. YOU CAN freeze it!!!
I added the statement from the USDA at the bottom of this page and you can see this page for the safety reasons why. A side benefit is that your house will smell wonderful while it is cooking - much better than potpourri!
Directions for Making Pumpkin Butter
Ingredients and Equipment
- 7 quarts of Pumpkin Puree (See step 1) Note: The yield is usually about 2 or 3 cups of puree per 6 inch diameter pie pumpkin! That cooks down to about half that volume in making pumpkin butter. So for 6 quarts of pumpkin butter, you'd need 5 or 6 small pie pumpkins! Similarly for 6 pints, you'd need 3 pie pumpkins. You can use any winter squash, like butternut or hubbard instead of pumpkin. Those actually turn out BETTER tasting than an ordinary pumpkin.
- Cinnamon
- Cloves
- Allspice
- 4 cups sugar - or 4 cups of Stevia (in a form like Truvia) or 3 cups of honey or agave or 3 cups of Splenda. I'm not here to judge... choose the form of sweetener that meets your needs best. It's only here for taste, so you can reduce (or add more if you like)
- Jar grabber (to pick up the hot jars)
- Lid lifter (has a magnet to pick the lids out of the boiling water where you sterilize them. ($2 at WalMart)
- Jar funnel ($2 at Walmart)
- 1 Crock pot (slow cooker)
- Large spoons and ladles
- Ball jars or other containers (Publix, WalMart carry then - about $8 per dozen quart jars including the lids and rings)
Recipe and Directions
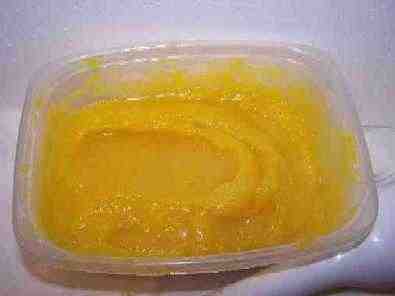 Step 1 - Make unsweetened pumpkin puree!
That's right, pumpkin butter starts with cooked pumpkin! You can use store bought pumpkin puree, but the pumpkin butter won't taste nearly as good. So if you haven't made some pumpkin puree yet start here with how to make pumpkin puree. Otherwise continue to step 2.
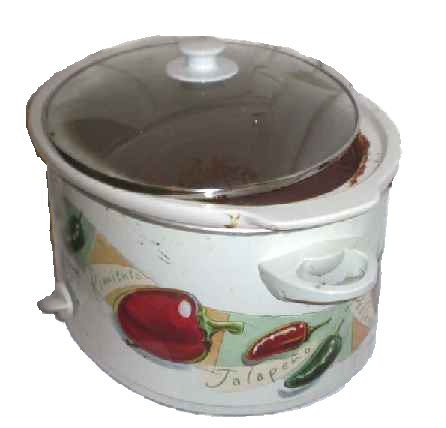
Step 2 - Fill the crock pot
Fill the crock pot to within 2 inches full with pumpkin puree, mine takes about 5 quarts.
Step 3 -Add the spices
Add:
-
2 tablespoons of ground cinnamon
-
1 teaspoon ground cloves
-
1/2 teaspoon of allspice
-
4 cups sugar or other swetener
Step 4 - Cook the Pumpkin butter
 Set the crock pot on low or medium
heat.
Set the crock pot on low or medium
heat.
Cover it loosely or use a large pot splatter-guard. It will spatter as it boils slowly, so I also cover nearby surfaces with towels. You don't want to seal it tightly because you want the steam to escape so it can reduce in volume and thicken.
Leave it to cook for 6 - 8 hours. How long depends on the size and power of your crockpot, and how thick you like it, If you want to stir it occasionally, that's fine but not necessary. I let mine go overnight.
It will reduce in volume by about half overnight. As it cooks down (the next morning), add the remaining pumpkin puree (about 2 or 3 quarts) and 2 more cups of sugar. Then let it cook a couple of hours more to mix the flavors.
Step 5 - Wash the jars and lids
Now's a good time to get the jars ready, so you won't be rushed later. The dishwasher is fine for the jars, the water bath processing will sterilize them as well as the contents! If you don't have a dishwasher, you can wash the containers in hot, soapy water and rinse, then sterilize the jars by boiling them 10 minutes, and keep the jars in hot water until they are used.
Leave the jars in the dishwasher on "heated dry" until you are ready to use them. Keeping them hot will prevent the jars from breaking when you fill them with the hot pumpkin butter.
Put the lids into a pan of boiling water for 5 minutes, and use the magnetic "lid lifter wand" to pull them out.
Step 6 - Blend the pumpkin butter (optional)
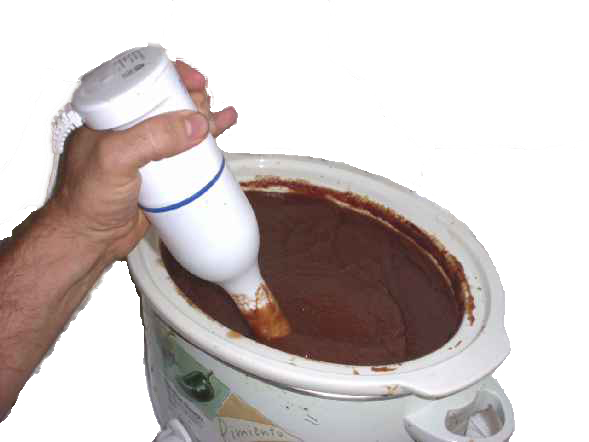 You want a smooth, creamy texture, right?
The easiest way is to use a hand-held drink blender. It does a great job
of making it smooth. You can also put it into a regular blender, but
if you are going to do that, you might want to blend the pumpkin sauce
before you put it in the crock pot (it will be much thicker afterwards and
won't move in a regular blender).
You want a smooth, creamy texture, right?
The easiest way is to use a hand-held drink blender. It does a great job
of making it smooth. You can also put it into a regular blender, but
if you are going to do that, you might want to blend the pumpkin sauce
before you put it in the crock pot (it will be much thicker afterwards and
won't move in a regular blender).
Tips:
- Too thick? if the pumpkin butter cooks down too much or is too thick for your liking, just add a little bit of apple juice and blend it in.
- Not thick enough? Just let it cook some more, with the lid off so the steam can escape!
Step 7 - Done
Fill
jars or other containers. Cool
the jars to near room temperature (a
couple of hours) Then pop them into the back of your fridge, or
bags in your freezer!
Note about canning pumpkin butter: Home canning is not recommended for pumpkin butter or any mashed or pureed pumpkin or winter squash. In 1989, the USDA's Extension Service published the Complete Guide to Home Canning, which remains the basis of Extension recommendations today, found in the September 1994 revision. The only directions for canning pumpkin and winter squash are for cubed pulp. In fact, the directions for preparing the product include the statement, "Caution: Do not mash or puree."
It is true that previous USDA recommendations had directions for canning mashed winter squash, but USDA withdrew those recommendations and any publications preceding the Complete Guide to Home Canning (September 1994) are considered out of date.
Some of the factors that are critical to the safety of canned pumpkin products are the viscosity (thickness), the acidity and the water activity. Studies conducted at the University of Minnesota in the 1970's indicated that there was too much variation in viscosity among different batches of prepared pumpkin purees to permit calculation of a single processing recommendation that would cover the potential variation among products (Zottola et. al, 1978). Pumpkin and winter squash are also low-acid foods (pH>4.6) capable of supporting the growth of Clostridium botulinum bacteria which can cause the very serious illness, botulism, under the right storage conditions. If the bacteria are present and survive processing, and the product has a high enough water activity, they can thrive and produce toxin in the product.
More recent research with pumpkin butter has been done at the University of Missouri. Pumpkin butter is mashed or pureed pumpkin that has had large quantities of sugar added to it, but not always enough to inhibit pathogens. Sometimes an ingredient such as vinegar or lemon juice is added to the formulation to increase the acidity (decrease the pH). However, pumpkin butters produced by home canners and small commercial processors in Missouri have had pH values as high as 5.4. In fact, the pH values seemed to be extremely variable between batches made by the same formulation (Holt, 1995).
It is not possible to evaluate a recipe for pumpkin or mashed squash for canning potential by looking at it. At this point, research seems to indicate variability of the products is great, and in several ways that raise safety concerns. It is best to freeze pumpkin butters or mashed squash.
References
-
Extension Service, USDA. 1994. Complete Guide to Home Canning. AIB No. 539. U.S. Department of Agriculture, Washington, DC.
-
Holt, D. September 22, 1995. Re: Pumpkin butter. Email message to fnspec_mg@ecn.purdue.edu .
-
Zottola, E. A., Wolf, I.D., Norsiden, K.L. and D.R. Thompson. 1978. Home canning of food: Evaluation of current recommended methods. Jn. of Food Science 43:1731.
Other Equipment:
From left to right: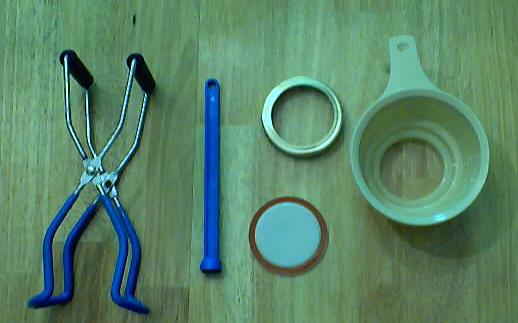
- Jar lifting tongs
to pick up hot jars - Lid lifter
- to remove lids from the pot
of boiling water (sterilizing ) - Lid
- disposable - you may only
use them once - Ring
- holds the lids on the jar until after
the jars cool - then you don't need them - Canning jar funnel
- to fill the jars
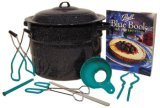 |
Home Canning KitsThis is the same type of standard canner that my grandmother
used to make everything from applesauce to jams and jellies to tomato and
spaghetti sauce. |
|
Lids, Rings, Jars, mixes, pectin, etc.Need lids, rings and replacement jars? Or pectin to make jam, spaghetti sauce or salsa mix or pickle mixes? Get them all here, and usually at lower prices than your local store! |


Can't find the equipment? We ship to all 50 states! Just email us!
Halloween Costumes
Here are some of the most popular Halloween costumes for children this year. For more choices, see our Halloween costumes pages.
Wizard Robe Cloak Halloween costume for Kids
Girl's Sparkle Princess Costume - In pink, for small girls
Sew your own Halloween Costumes with Patterns from the Singer Sewing Reference Library
Pizza Costume for Kids - A giant slice of pizza Halloween Costume for Children and Teens
Find Related Information and Resources Here!
Here's the quick list to related farms for PYO, Honey, Pumpkins, Christmas trees, etc.:
You may find these websites useful!
Local pick your own farms for apples, strawberries, raspberries, corn, tomatoes, etcr
Farm markets and roadside stands
Road tripping and camping tips, tricks and How-to's
Venues for you event: Farms, Wineries, Orchards for your event, wedding or party
Festivals: Fruit and vegetable festivals
Winery tours and wine tastings
Horses: rides, stables, lessons, trails
Maple Syrup farms and sugarworks
Bed and Breakfasts on Farms, Wineries, Ranches and Orchards
Water bath canning kit - 8 Piece Enamelware Pot with Canning kit and Rack. Canning Supplies Starter Kit
Double Donut Pumpkin Spice Coffee Pods, Single Serve Flavored Coffee for Keurig K Cups Machines,
Pumpkin Spice - Organic, 1.94-Ounce Jar, Nutmeg, Cloves, Ginger & Cinnamon, Enhances Tea, Seasoning, Kosher
Maud's Pumpkin Spice Instant Latte - 16 count Packets, Love Me Some Pumpkin Spice Latte
Pumpkin Pie Spice Blend Extract,McCormick Pure
Don't miss our page of costumes, ready made and ones you can make yourself!
And here's a book of 130 pumpkin carving stencils!
Pumpkin Carving stencils book - Over 130 Halloween jack olantern pumpkin designs. Including Witches, Cats, skulls, bats, ghosts, and so much more
More carving kits and stencils are here!
Find Other types of farms:
Farm markets and roadside stands
Get the
most recent version of
the Ball Blue Book
Click here to get Halloween Costumes delivered - fast, great prices!
Click here to get Halloween Costumes delivered - fast, great prices!
Find Other types of farms:
Farm markets and roadside stands
Get the
most recent version of
the Ball Blue Book